Every website on a cPanelcPanel The most popular hosting control panel: a website where you manage your email, files, databases and domains with point-and-click tools instead of commands. More about cPanel → server lives in a cPanel account: its own login, home folder, databases, mailboxes and limits. In WHMWHM WebHost Manager: the administrator side of cPanel, used by whoever runs the server to create and manage hosting accounts. More about WHM →, Create a New Account sets one up in under a minute.
In WHM, open Account Functions » Create a New Account. Enter the domain, let WHM suggest a username, generate a strong password, add the owner’s email, choose a package, and click Create. Then point the domain’s DNSDNS The internet’s phone book. It turns a name people can remember, like example.com, into the number address computers use to find the server. More about DNS → at the server so the site and its certificate work.
Before you start
- Create a package first, so the account’s limits come from a plan rather than one-off values. See packages in WHM.
- Know where the domain’s DNS is. If this server will host the DNS, the customer must point the domain’s nameserversNameserver The server that holds all of a domain’s settings. Whoever runs your nameservers controls where your website and email point. More about Nameserver → here. If DNS is elsewhere, they add an A record pointing to the server.
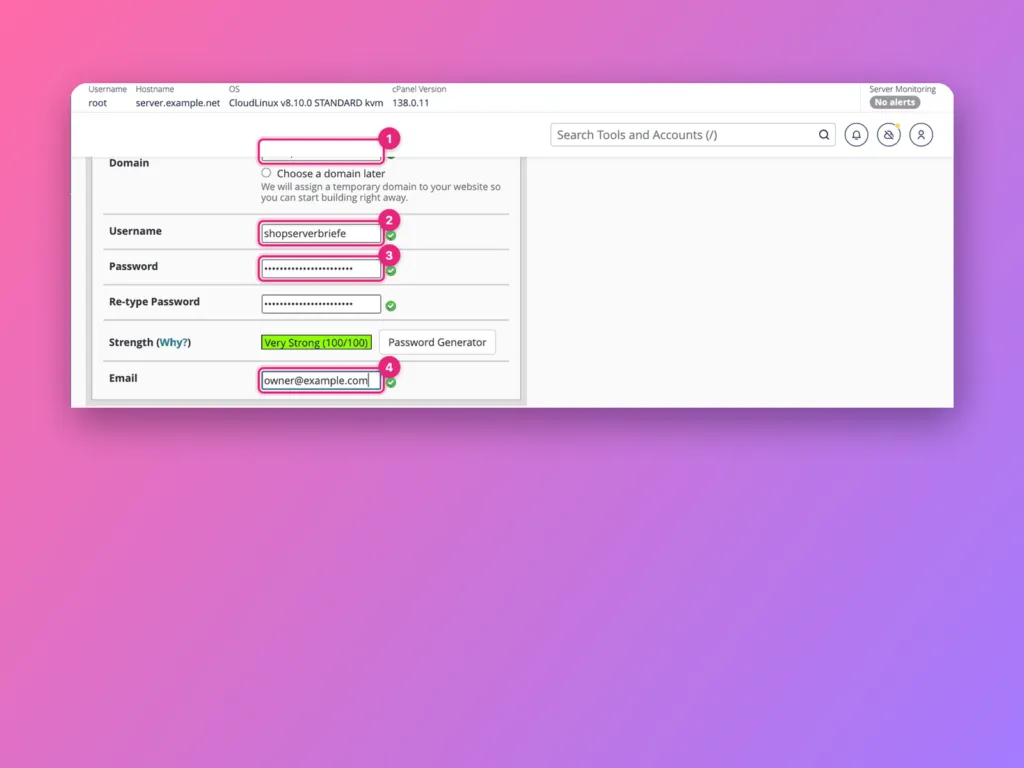
1. Domain, username, password and email
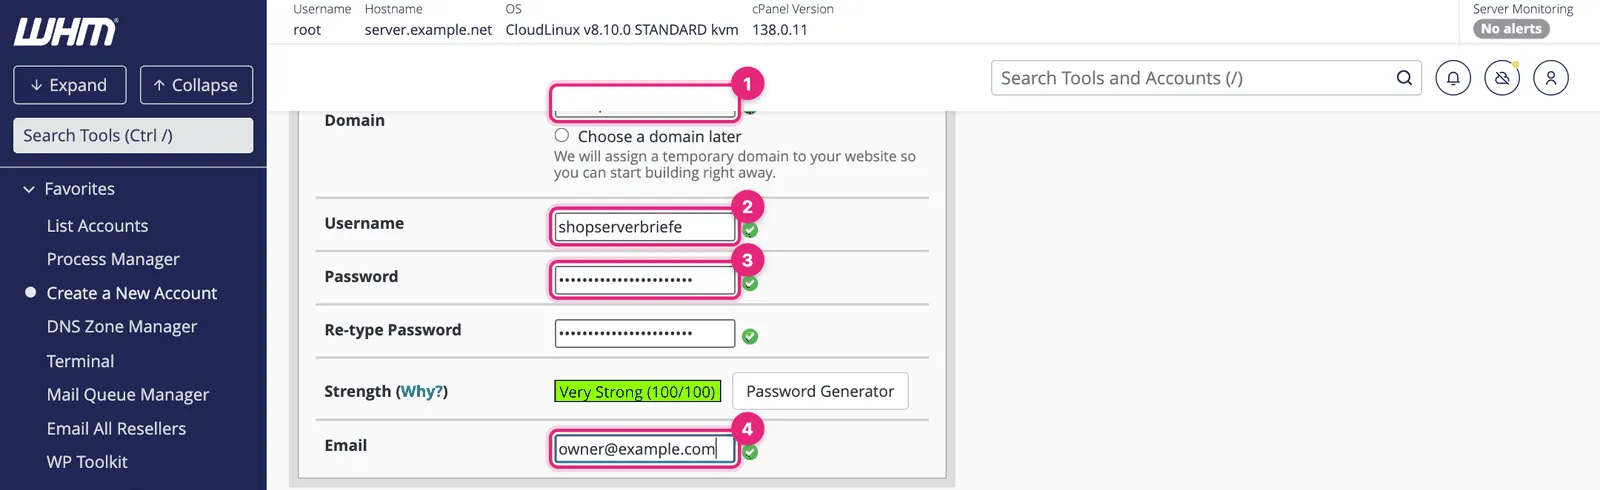
- Domain: the account’s main domain, such as
example.com, withoutwww. Choose a domain later creates the account on a temporary domain instead, for building a site before the real domain is ready. - Username: WHM suggests one from the domain. It must start with a letter and be at most 16 characters. It appears in database names, FTP logins and the home folder (
/home/username), so pick something neutral; you cannot rename it freely later without side effects. - Password: use Password Generator and give it to the customer through a secure channel, or let them reset it. WHM shows a strength score and refuses weak passwords.
- Email: the customer’s contact address. cPanel sends quota warnings and important notices here, so it must be a mailbox they read, ideally not on this same account.
2. Package and settings
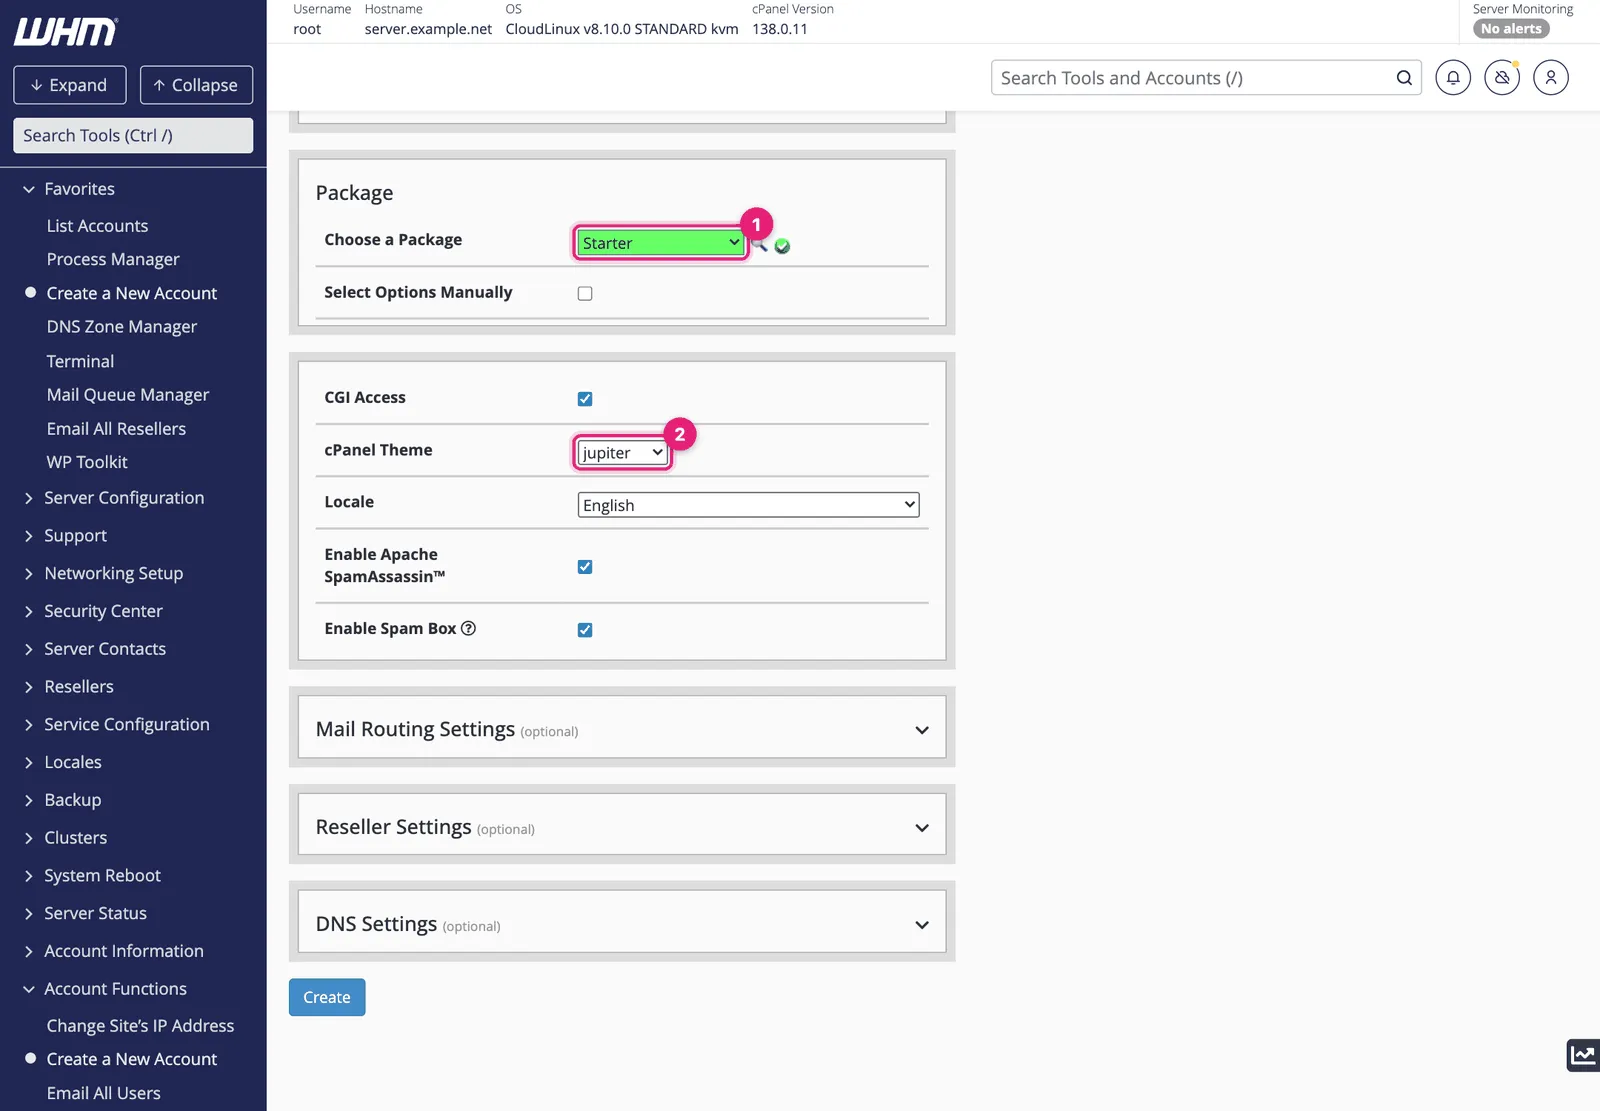
- Choose a Package sets the disk, bandwidthBandwidth How much data your website is allowed to send to visitors each month. Every page view uses a little; images and video use the most. More about Bandwidth →, email, database and domain limits. Select Options Manually sets them for this account only; avoid it unless the account is truly a one-off.
- cPanel Theme is Jupiter by default. Leave CGI Access, SpamAssassin and Spam Box on unless you have a reason not to.
Further down, three optional sections:
- Mail Routing Settings: leave on Automatically Detect Configuration. Choose Remote Mail Exchanger if the domain’s email is with Google Workspace or Microsoft 365.
- Reseller Settings: makes the account a reseller. Leave off for normal customers.
- DNS Settings: whether this server creates a DNS zone for the domain, and whether to use the server’s nameservers. If the domain’s DNS is elsewhere, you can skip the local zone, but keeping it does no harm.
3. Create
Click Create. WHM checks the details and builds the account, showing each step:
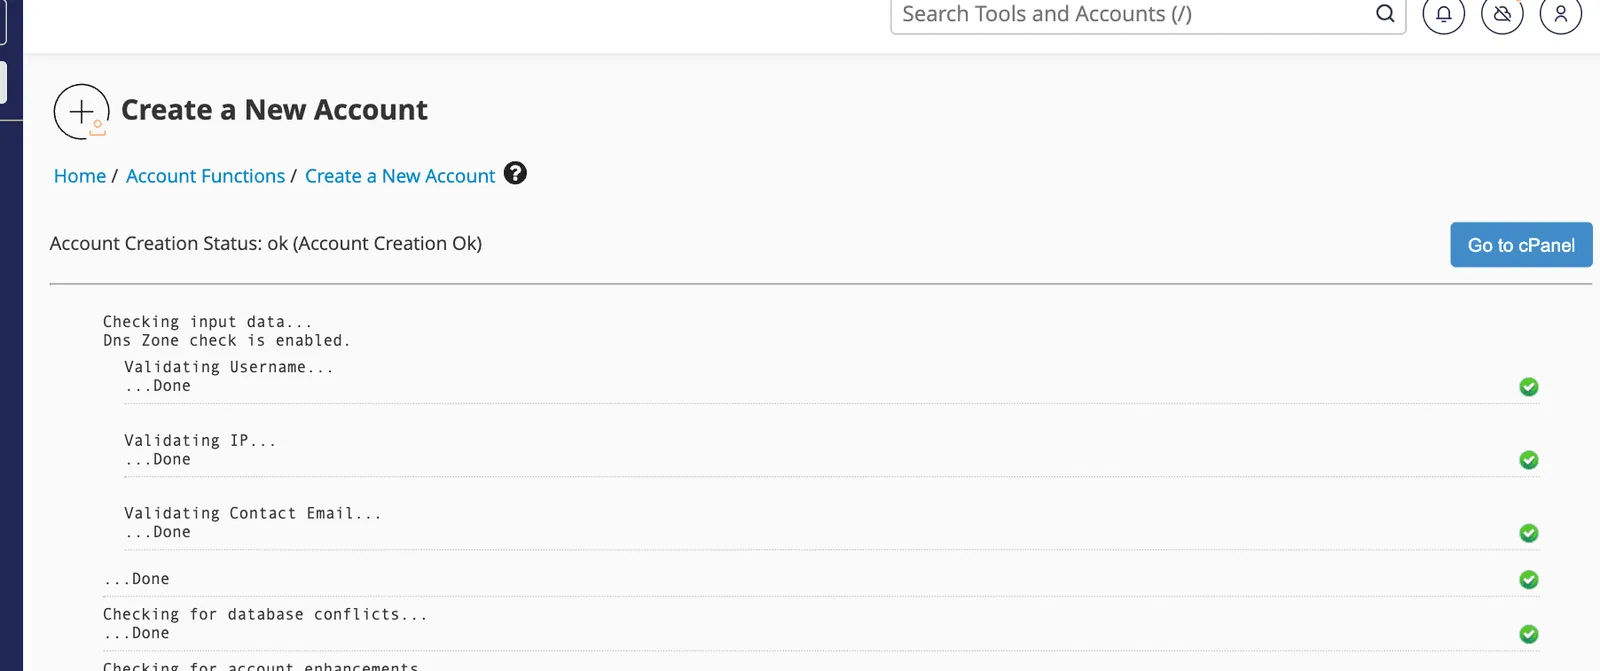
Account Creation Status: ok means it worked. The log goes on to list the account’s details, including the IP addressIP address The number address of a device on the internet, like 203.0.113.10. Computers use it to find each other, the way post uses street addresses. More about IP address → the domain should point to and the nameservers. Go to cPanel opens the new account as its owner.
If creation fails, the log says why. The usual reasons:
| Message | Fix |
|---|---|
| The domain already exists on this server | It is already an account, addon domain or alias somewhere. Find it in List Accounts or DNS Zone Manager |
| The username is invalid or taken | Choose another; usernames cannot start with test and must be unique |
| The password is too weak | Generate one |
| Package limit reached | Resellers have a cap on accounts; raise it as root |
4. Check it in List Accounts
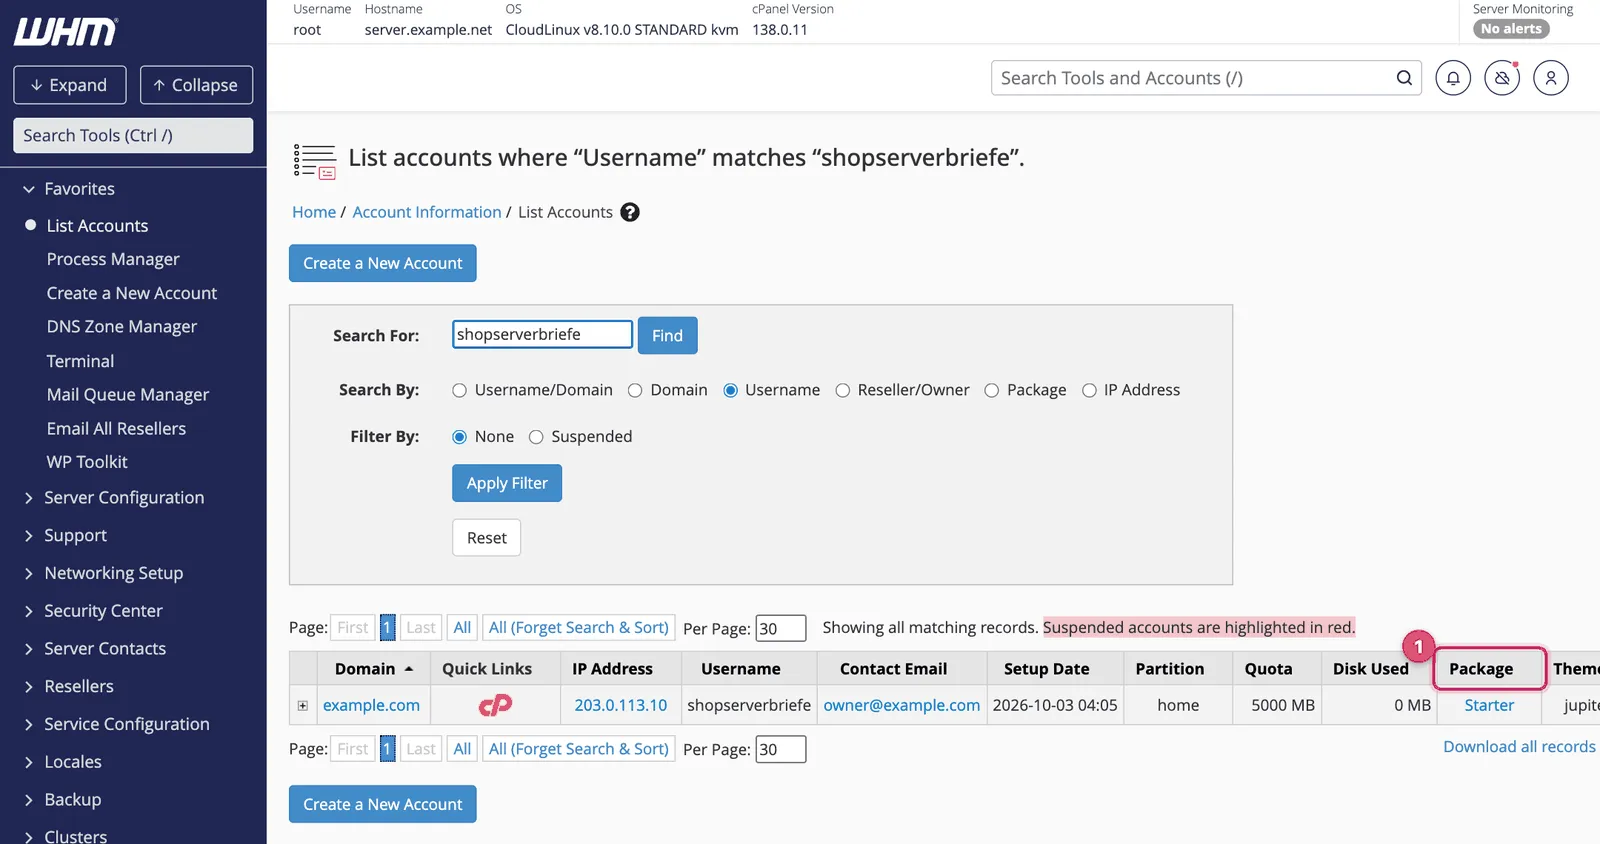
Search by username or domain to see the account’s domain, IP address, owner, setup date, disk quota and package. The + at the start of the row expands quick actions; the cP icon opens its cPanel.
5. Make the domain work
The account exists, but visitors only reach it once DNS points here:
- Nameservers at the registrarDomain registrar The company you buy and renew your domain name from, and where you choose who handles its settings. More about Domain registrar → set to this server’s nameservers, if the server runs the domain’s DNS.
- Or an A recordA record The line in a domain’s settings that says which server’s address to send visitors to. Like a forwarding address card for your website. More about A record → for the domain and
wwwpointing at the IP shown in the log, if DNS is elsewhere. See how to point a domain to a server.
Once DNS resolves, AutoSSL issues a certificate within a few hours. See AutoSSL in WHM.
Creating accounts from the command line
With root SSHSSH A secure way to type commands on a server from your own computer, as if you were sitting at it. More about SSH → access, the same can be done in one command, useful for scripts:
whmapi1 createacct username=exampleco domain=example.com plan=Starter contactemail=owner@example.comOmit password to have WHM generate one, which it prints in the output.
Related
- How to manage cPanel accounts in WHM: modify, suspend and terminate.
- How to use WHM.
Something out of date? Software changes. If a step no longer works, tell us and we will check it and update the page.